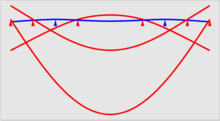
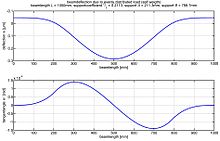
Airy points (after George Biddell Airy) are used for precision measurement (metrology) to support a length standard in such a way as to minimise bending or drop of a horizontally supported beam.
Choice of support points

A kinematic support for a one-dimensional beam requires exactly two support points. Three or more support points will not share the load evenly (unless they are hinged in a non-rigid whiffle tree or similar). The position of those points can be chosen to minimize various forms of gravity deflection.
A beam supported at the ends will sag in the middle, resulting in the ends moving closer together and tilting upward. A beam supported only in the middle will sag at the ends, making a similar shape but upside down.
Airy points


Supporting a uniform beam at the Airy points produces zero angular deflection of the ends. The Airy points are symmetrically arranged around the centre of the length standard and are separated by a distance equal to
of the length of the rod.
"End standards", that is standards whose length is defined as the distance between their flat ends such as long gauge blocks or the mètre des Archives, must be supported at the Airy points so that their length is well-defined; if the ends are not parallel, the measurement uncertainty is increased because the length depends on which part of the end is measured. For this reason, the Airy points are commonly identified by inscribed marks or lines. For example, a 1000 mm length gauge would have an Airy point separation of 577.4 mm. A line or pair of lines would be marked onto the gauge 211.3 mm in from each end. Supporting the artifact at these points ensures that the calibrated length is preserved.
Airy's 1845 paper derives the equation for n equally spaced support points. In this case, the distance between each support is the fraction
the length of the rod. He also derives the formula for a rod which extends beyond the reference marks.
Bessel points


"Line standards" are measured between lines marked on their surfaces. They are much less convenient to use than end standards but, when the marks are placed on the neutral plane of the beam, allow greater accuracy.
To support a line standard, one wishes to minimise the linear, rather than angular, motion of the ends. The Bessel points (after Friedrich Wilhelm Bessel) are the points at which the length of the beam is maximized. Because this is a maximum, the effect of a small positioning error is proportional to the square of the error, an even smaller amount.
The Bessel points are located 0.5594 of the length of the rod apart, slightly closer than the Airy points.
Because line standards invariably extend beyond the lines marked on them, the optimal support points depend on both the overall length and the length to be measured. The latter is the quantity to be maximized, requiring a more complex calculation. For example, the 1927–1960 definition of the metre specified that the International Prototype Metre bar was to be measured while "supported on two cylinders of at least one centimetre diameter, symmetrically placed in the same horizontal plane at a distance of 571 mm from each other." Those would be the Bessel points of a beam 1020 mm long.
Other support points of interest
Other sets of support points, even closer than the Bessel points, which may be wanted in some applications are:
- The points for minimum sag, 0.5536 times the length. Minimum sag occurs when the centre of the rod sags the same amount as the end points, which is not quite the same thing as minimum horizontal motion of the ends.
- The nodes of free vibration, 0.5516 times the length.
- The points for zero central sag (any closer and the beam rises between the support points): 0.5228 times the length.
See also
- History of measurement
- History of the metre
- Neutral plane
- Test method
- Units of measurement
- Weights and measures
References
- ^ Airy, G. B. (10 January 1845). "On the Flexure of a uniform Bar supported by a number of equal Pressures at equidistant points, and on the Positions proper for the Applications of these Pressures, in order to prevent any sensible Alteration of the Length of the Bar by small Flexure". MNRAS (pdf). 6 (12): 143–146. Bibcode:1845MNRAS...6..143A. doi:10.1093/mnras/6.12.143.
- ^ Quick Guide to Precision Measuring Instruments (PDF) (Technical report). Mitutoyo. October 2012. p. 19. No. E11003 (2).
- ^ Verdirame, Justin (10 February 2016). "Airy Points, Bessel Points, Minimum Gravity Sag, and Vibration Nodal Points of Uniform Beams". Retrieved 2016-08-29.
- Sawyer, Daniel; Parry, Brian; Phillips, Steven; Blackburn, Chris; Muralikrishnan, Bala (2012). "A Model for Geometry-Dependent Errors in Length Artifacts" (PDF). Journal of Research of the National Institute of Standards and Technology. 117: 216–230. doi:10.6028/jres.117.013. PMC 4553879. PMID 26900525.
- Fischer, Louis A. (November 1904). "Recomparison of the United States prototype meter" (PDF). Bulletin of the Bureau of Standards. 1 (1): 5–19. doi:10.6028/bulletin.002.
- Judson, Lewis V. (20 May 1960). Calibration of Line Standards of Length and Measuring Tapes at the National Bureau of Standards (PDF) (Technical report). National Bureau of Standards. NBS Monograph 15.
- Phelps, F. M. III (1966). "Airy Points of a Meter Bar". American Journal of Physics. 34 (5): 419–422. Bibcode:1966AmJPh..34..419P. doi:10.1119/1.1973011.
- International Bureau of Weights and Measures (2006), The International System of Units (SI) (PDF) (8th ed.), p. 143, ISBN 92-822-2213-6, archived (PDF) from the original on 2021-06-04, retrieved 2021-12-16
- Nijsse, Gert-Jan (12 June 2001). Linear Motion Systems. A Modular Approach for Improved Straightness Performance (Ph.D. thesis). p. 39. ISBN 90-407-2187-4.
- Smith, S. T.; Chetwynd, D. G. (1994). Developments in Nanotechnology. Vol. 2. Taylor & Francis. p. 323. ISBN 978-2-88449-001-6.
{{cite book}}:|work=ignored (help) - Phelps, Frederick M. III (May 1966). "Airy Points of a Meter Bar". American Journal of Physics. 34 (5): 419–422. Bibcode:1966AmJPh..34..419P. doi:10.1119/1.1973011.
- Lewis, Andrew John (2002) . "Appendix C: Flexing of length bars" (PDF). Absolute length measurement using multiple-wavelength phase-stepping interferometry (Ph.D. thesis) (2 ed.). Department of Physics, Imperial College of Science, Technology and Medicine, University of London. Retrieved 2015-10-13.

